
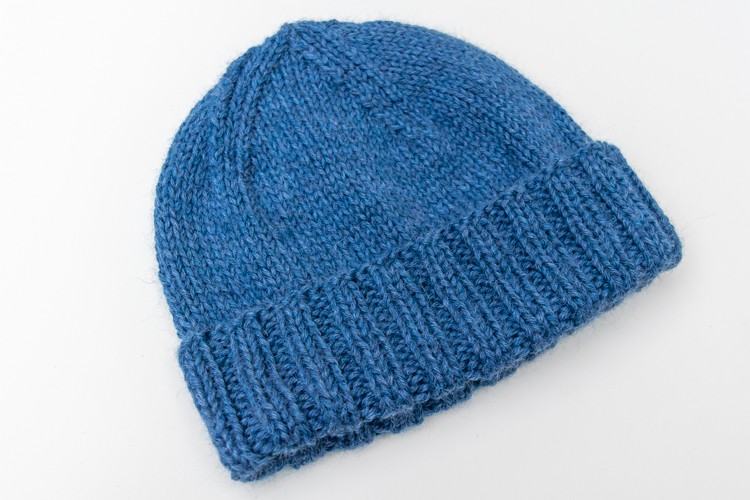
This knit hat pattern for a cuffed beanie makes a classic style — like worn blue jeans or Chuck Taylors — but with the right yarn, it also makes a very lux piece. And who doesn’t want both of those things?
It’s a pretty straightforward pattern, but if you’re newer to knitting, I’ve added a lot of explanatory text that you wouldn’t usually get with most patterns.
Because this pattern uses a double-stranded yarn, it’s a very warm hat, like New England winters, not SoCal winters. It is co-zeee. But it also means it knits up pretty quickly.
Why not just use a bulky yarn you ask? Because it didn’t come out the same. Something about the drape of the finished fabric. I dunno. It was different and I didn’t like it as much.
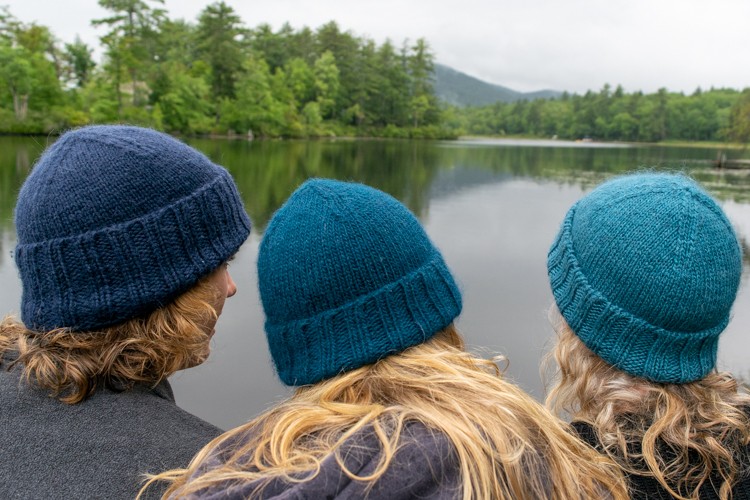
I actually made this beanie hat for myself to start (seems like I always end up knitting for everyone else and never for myself). I had some lovely silk alpaca yarn that my parents brought back from Australia for me. It’s that gorgeous teal I’m wearing on the right in the photo below of me and my two rabbits. And then of course the kids both wanted one, so we made a trip to the yarn store so they could choose the yarn themselves.
Cuffed Beanie Supplies
- 2 skeins of Cascade Pure Alpaca (I used 3032 Denim), or another aran-weight yarn
- US size 6 16-inch circular needles (or size needed to obtain gauge)
- US size 7 16-inch circular needles (or size needed to obtain gauge)
- US size 7 double-pointed needles (or size needed to obtain gauge)
- 4 stitch markers (one different, three the same)
- yarn needle
Gauge
4 stitches = 1 inch in stockinette stitch
Size
Small Adult: 20-inch circumference, 11 inches high
Large Adult: 22-inch circumference, 12 inches high
Cuffed Beanie Pattern
- Tips on knitting with two balls of yarn
I really struggled knitting with two balls of yarn until I started using a little cloth bag to hold them while I knit. Somehow it’s enough to keep them from turning into a tangled mess.
You can either wind both skeins into balls and use them both, or pull from the center and the outside of one ball, or split them into two smaller balls (I used a kitchen scale to get them even).
You won’t need all of it, and I’d rather have one larger ball at the end to put in my stash than two smaller balls, but it’s up to you. - Cast on
Cast on 84 (92) stitches using the long-tail cast on method.
Or, if you are an experienced and/or ambitious knitter, use the Long Tail Tubular Cast On. This technique creates a very clean, elastic edge for a ribbed cuff. However, I find that it requires a lot of focus, and you really need to complete the cast-on row and the foundation rows in one sitting. At least, I do or I get lost.
Also, for a 2×2 rib stitch (2 knit stitches, 2 purl stitches) you need to add an extra foundation row in order to rearrange the stitches into the correct order. I know. It’s time-consuming and tricky, so only attempt this if that sounds fun to you! - Join the stitches
Join the stitches for knitting in the round, being careful not to twist the stitches and placing a marker at the beginning.
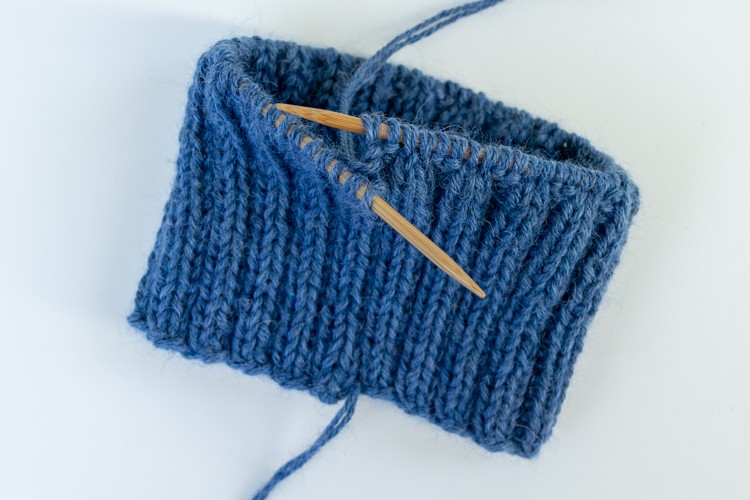
- Knit the ribbed cuff
Knit in 2 by 2 rib for 4 inches. That means knit 2 stitches, purl 2 stitches, around and around until your knitting measures 4 inches.

- Switch to stockinette
At the end of the round, switch to the larger size needles and start knitting in stockinette stitch. Since you are knitting in the round, that means you’re just going to knit every stitch, until your knitting measures 9 inches.
- Start decreasing rounds
For the next round:
• knit one stitch
• ssk (slip one stitch knitwise, slip one stitch purlwise, then insert the left needle into the front of these two stitches and knit them together)
• knit 16 (18) stitches
• knit two together (k2tog) and place a marker (make these markers a different color than the marker you already have placed at the beginning of the round)
• repeat this pattern until the end of the round
• knit one full round
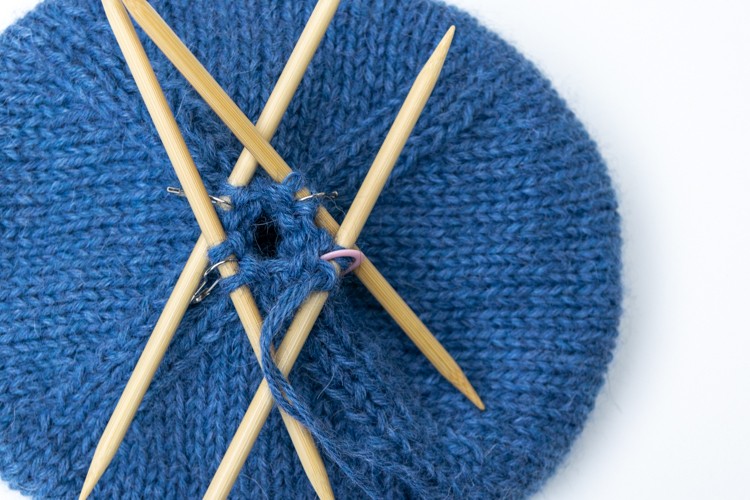
You should now have 4 markers — 3 you just placed and the original one to mark the beginning of the round — with 19 (21) stitches between them, for a total of 76 (84) stitches.
For your next rounds, you are going to repeat the above pattern, decreasing the number of stitches knit between the ssk and the k2tog by two stitches each round. Continue knitting in this pattern until you have 12 (or 8) stitches remaining. (For the last round you won’t have enough stitches to ssk and k2tog in each section, so just knit the center two stitches together.)
Use the markers to remind you when to ssk and when to k2tog. Switch to your double-pointed needles when your knitting gets too tight to fit on the circular needles.
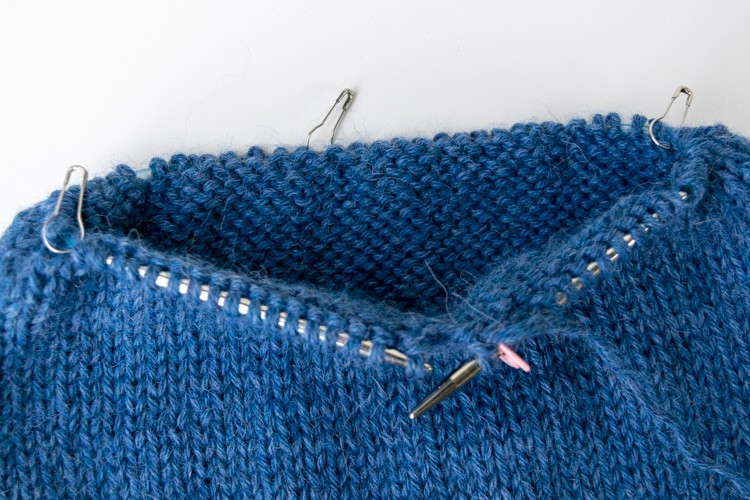
This is what your hat will look like after you place the markers: - Bind off
Cut your yarn, leaving an 8-inch tail. Using a yarn needle, thread your tail through the remaining stitches and pull snug. Tie off on the inside, and sew in the end.
This is what your hat will look like just before you bind off:
I hope you enjoy making and wearing your new hat. Please pin this post if you like it, and please join my email list!
If you want to do more knitting, check out this pattern for Fingerless Gloves.
This hat looks lovely but can it be converted to normal knitting needles please
I’d be happy to convert the pattern, but it’ll take me a little while!
Hi Merel and Doreen. Is this available as a two needle pattern yet please?
Not yet Gillian.
For the main stockinette part, just do the knit row as written (with the decreases when you get to that part), and for row 2), purl back. For the ribbed cuff, just do a normal 2×2 rib, same on each side if you’ve cast on 84 (anything divisible by 4). Then seam at the end.
Or cast on 86 and make the first and last stitch a selvedge stitch of your choosing (plain stockinette, or one you prefer) for seaming up at the end.
Example: cast on 86. This allows for one selvedge stitch at each side.
CUFF: 1 RS) K1, *k2p2* to last st, k1. Turn.
2 WS & remaining cuff rows) Repeat row 1 until cuff is 4″.
HAT MAIN BODY: st st for 5″ (K RS, P WS) till total length is 9″.
CROWN – Decreases:
1 RS) k1 *k1 SSK k16 k2tog* 4 times k1. 78 sts remaining.
2 WS) P across
Row 3, substitute k14 for the k16 in the center of each decrease section (70 rmng); row 5, k12 (62 rmng); row 7, k10 (54 rmng); row 9, k8 (46 rmng); row 11, k6 (38 rmng), row 13, k4 (30 rmng); row 15, k2 (22 rmng), row 17, just (k1, SSK and k2tog)x4 & all even rows, purl across (14 rmng).
When you have 14 sts remaining (9 decrease rows have been knit), r19) k1 *k1 k2tog* 4 times k1 = 10 sts to draw together after you seam it up.
This really needs a test knit, since I’m figuring it out on the fly. I’ll be glad to hear corrections, and I doubt I’ll test it any time soon myself, as I rarely flat knit stuff any more if I don’t need to.
I’ve found a crochet cast on also gives more stretch for a 1×1 or 2×2 rib. Or a German tail cast on. I definitely have to focus with a tubular cast on.
Great tip! I’ll have to give the crochet and German tail cast on a try.
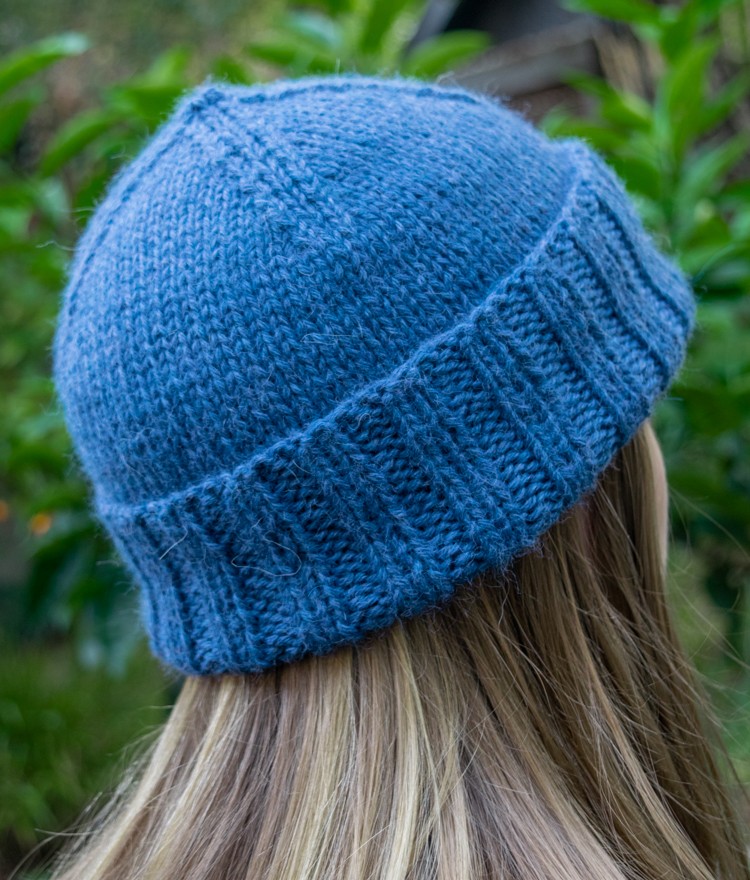
Hey, is the ribbed part of the hat going to be folded over or not? I can tell from the pictures.
Thanks a lot.
Yes. At least, that’s how I wear it. I suppose you don’t have to!
I would like to join your email list. How do I do this?
That’s great Cathie! If you look to the right of the big photo at the top of this page, you’ll see a form where you can sign up for my newsletter. (If you’re on your phone then it will be down below the comments.)
How would you do a crochet cast on? Do you switch to circular needles after making a chain?
Thank you
I like that you showed photos and gave clear directions. Please add me to your mailing list.
It was really eRy until I got to the decreasing instructions. I didn’t get that so I did regular decreases and now it looks like an extended back but I love it and love the colors. I will now make mittens and a scarf. Since I have 6 tubs of yarn and I am retired,I will make hats ,mitts and scarfs for kids and the homeless😉
Congratulations on the clarity of your written instructions! You’re amazing. Thank you so much.
Love your very explicit directions!!!
Can this pattern be printed?
Wonderful instructions and photos of how to do this. I have never succeeded on knitting “in the round” but I am going to try again–thanks to you and your pattern! Thanks again !!!
Thank you for the clarity of instructions. The dual threads gives a warmer feel and a neat look. A great result! I will definitely be using this pattern again.
Can it be knit with one strand of yarn? I