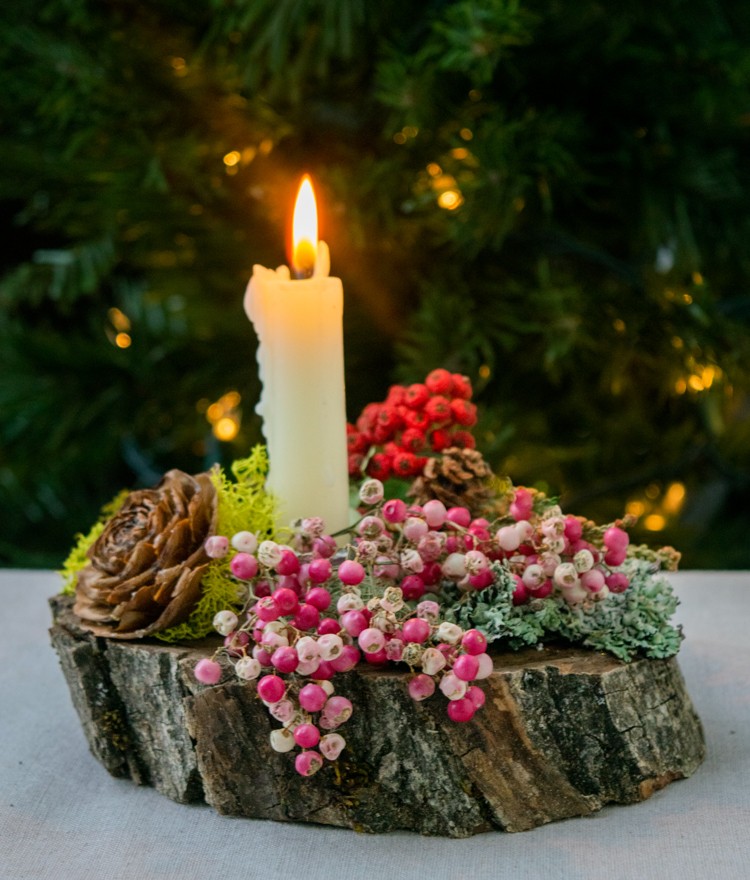
If you’re looking for an easy Christmas craft this season, I’ll show you how to make a simple, natural candleholder with things you can gather close to home.
This a craft that captures the spirit of the season for me — gathering materials from nature allows you to really stop and notice, to look closely at things that you would otherwise glance past, to slow down. And then you add candlelight, which feels even more elemental at this time of year with the long, dark cold days.
I find this project to be a real stress reliever as well, with the nature walks to gather things and the lack of fussiness. Let’s face it, you really can’t mess it up. For that reason it’s a great thing to make with kids — we have made these every year since my children were very small.
If you don’t have any suitable logs around to make a base, you can try a live Christmas tree stand near you. They are always making a fresh cut on the bottom when anyone buys a tree and will likely have plenty of pieces lying around that will work.
If you are worried about the fire risk, you can cover your taper with a glass hurricane candle sleeve, or use a flameless LED candle. We really only light these for our dinner table so we always have an eye on them, especially as the candle starts to get shorter.
Be sure to try some of my other holiday crafts like this Dried Orange Garland or these Origami Paper Lanterns.
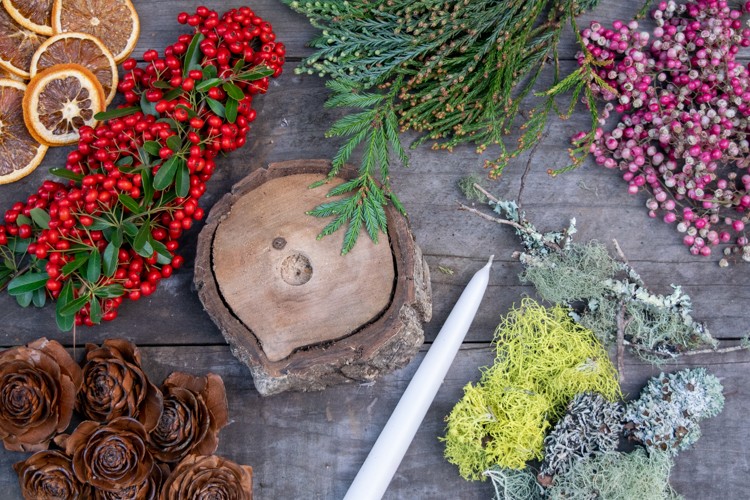
Candleholder Supplies
- 1–2 inch thick round wood base (can be any kind of wood; watch out for sap)
- 10-inch taper candle (these beeswax ones are especially lovely, but these hand-dipped ones are a very affordable option) or flameless LED candle
- piece of tin foil, roughly 6 x 8 inches
- bits to decorate with: dried berries, lichen, branches, moss, pinecones, seedpods, dried orange slices, cedar roses, pink pepper berries
- craft glue or a glue gun
- small garden clippers
- glass hurricane candle sleeve (optional)
Time needed: 45 minutes
Candleholder Instructions
- Gather all your decorations
This step is at least as much fun as the actual decorating, walking around in the woods and meadows picking up all the little beautiful bits. You can rope in other people to help collect when they’re out on their meanderings — children are especially good helpers. You can also purchase a few things on Etsy or at a local flower shop if you are so inclined.
If you don’t have a Deodar Cedar tree nearby, you can buy the cedar roses on Etsy, as well as things like dried orange slices, pink pepper berries, and lots of other kinds of dried berries, lichens, seed pods, and cones.
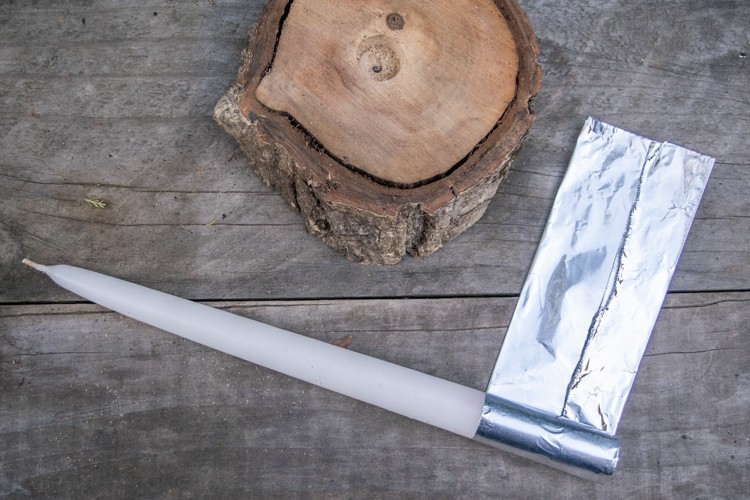
I like to have my candleholders decorated with our local flora, so for me, that’s redwood branches and cones, eucalyptus pods, pepper berries (not native but common), cedar roses, lichens, and other windfalls I find in the woods. Maybe you live near the beach (physically or spiritually) and want to use shells or small pieces of driftwood? Or you live in the mountains and have lots of pinecones and evergreens? Make your candleholder suit you. As I always say, you do you. - Drill a whole in your candle base
Drill a hole ___ in diameter and about ___ an inch deep, or the diameter needed to fit your candle. It can be a tiny bit larger than your candle since you are going to wrap the base in tinfoil to make a tight fit.
If you have a much wider base, you could drill a few holes so you have 3 candles instead of just one. (I don’t recommend doing two candles though — even numbers are tough.) - Wrap the candle base in tin foil
(If you are using an LED candle you can skip this.) Fold the foil a couple of times lengthwise so it’s a little thicker and you have a clean edge on at least one side. It should be about 2–3 inches wide and about 8 inches long. Roll the foil around the base of the candle so that’s smooth and snug, with about half an inch overhanging the end of the candle. Push the overhanging foil in around the bottom of the candle.

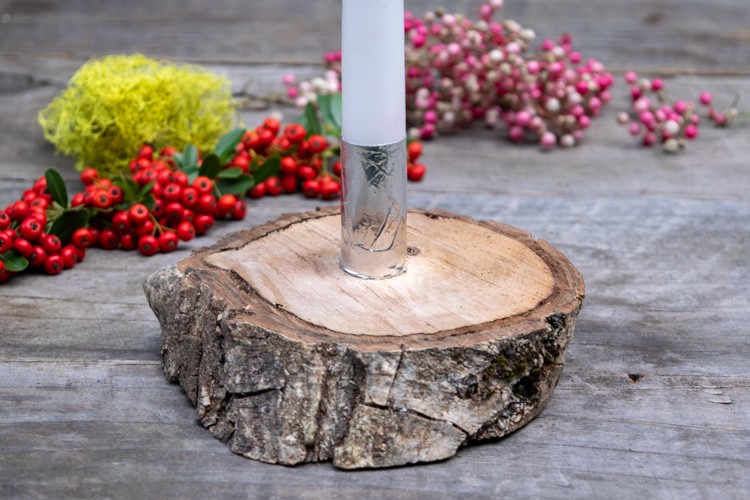
- Fit the candle into the hole
Fit your candle wrapped in tinfoil into the hole and made sure it’s snug. If you are going to use a hurricane sleeve, you should place it over the candle before you decorate the base. That way, you’ll know it’ll have a flat, clear area to sit on.
- Decorate your candle base
This is where the fun really gets going! Put on some music, pour yourself some wine or a cup of tea, and enjoy pulling it all together to make something that you will enjoy on the dark winter nights to come.
Some tips for decorating:
• Layering the elements works well, so start with flatter things like evergreen branches, moss, dried oranges, or pieces of lichen, and then add bulkier things like berries, pine cones, or seed pods.
• Tuck things into or under other things.
• More is more — this isn’t the time for minimalism. Really layer stuff on.
• Stick with odd numbers of things, especially the same kind of thing.
• Don’t go for perfect; a looser, messier approach is good. - Let the glue dry
If you used craft glue, let the glue dry completely by letting it sit for 6–8 hours or overnight.
I hope you enjoyed making your candleholder. Please pin this post if you like it! And join my email list if you want to receive my newsletter with curated suggestions for other things to make and bake.